Please configure the Smart Shipping and default data setup in the following path in Business Central
Home Page -> Setup & Extensions -> Assisted Setup -> VLC Shipping Setup
Note: If all the required data setup is completed, its status will be shown as Completed in Green

To Start with: Click on VLC Shipping Setup to open the list of setups

- Location
In the locations, you should set up the Application Type field as Advanced or Standard.
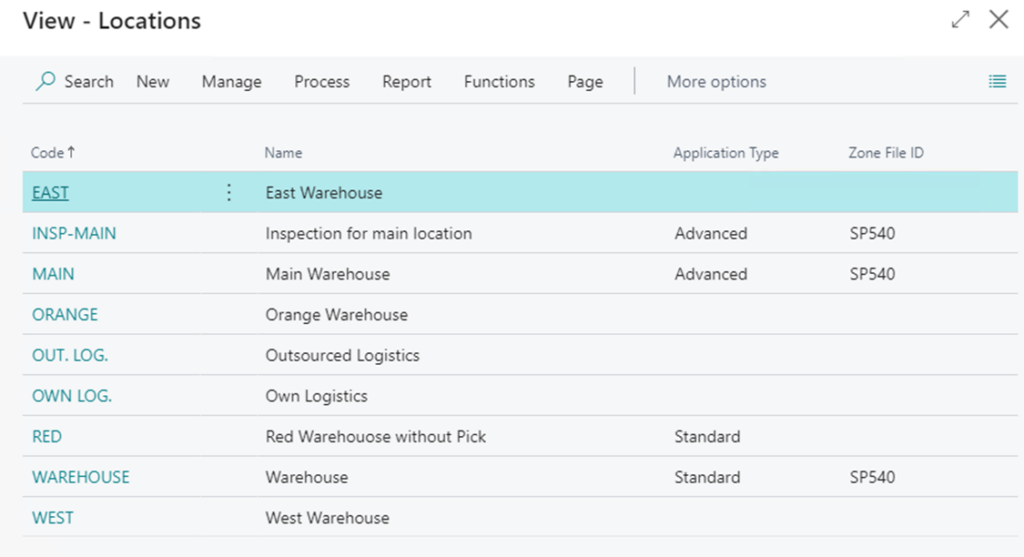
Note: Application Type:
| Option | Description |
| Blank | Leave it blank if you do not want to use this location in smart shipping. |
| Standard | If the shipment process is Standard i.e. Packing & Shipping, it will perform in one place at a time. |
| Advanced | If the shipment process is Advanced i.e. Packing & Shipping, it will perform at different places. |
2. Packing Center
- Open the Packing Center page by clicking on Packing Center Record on the VLC Shipping Assisted Setup list page.
- In this, we have to set up the Packing center, fill the Packing Center and if you would like to print the Package label, then set up the Package Label data and click on Close as shown in the below screenshot: –

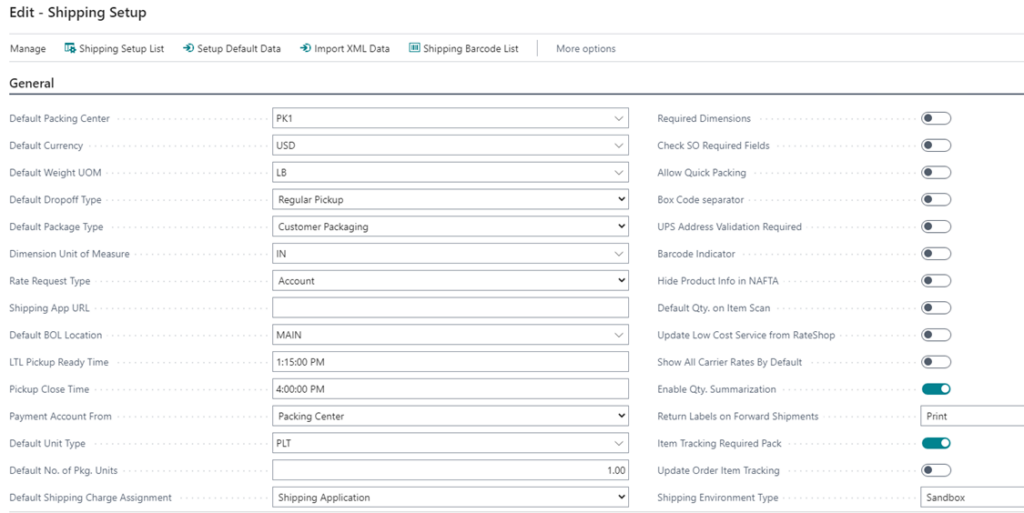
3. Shipping Setup
- Open the Shipping Setup page by clicking on Shipping Setup Record on the VLC Shipping Assisted Setup list page.
- Fill in the Shipping setup and click on Close as shown in the below screenshot.
- Here you should define Default Packing center field to complete the Shipping Setup.

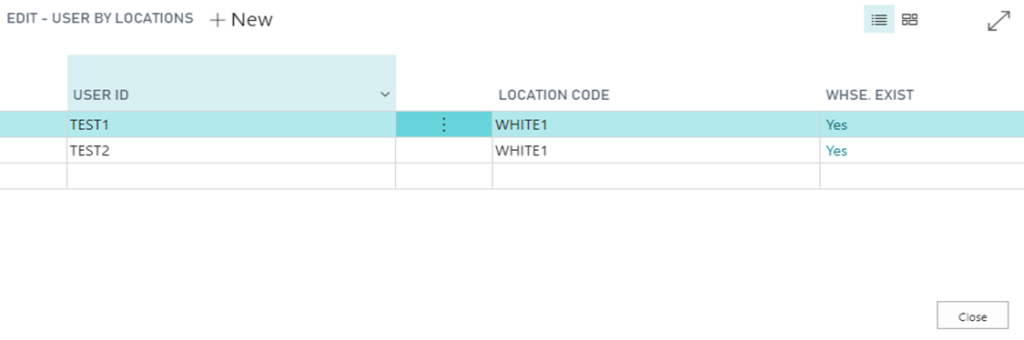
4. User by Location
- Open the User by Locations page by clicking on the User by Locations Record in the VLC Shipping Assisted Setup list page.
- Fill the data in the User by Locations page and Click on Close as shown in the below screenshot.
- If the Location is Warehouse, then, Whse. Exist field will update as True or else False.
5. Shipping User Setup
- Open the Shipping User Setup page by clicking on Shipping User Setup Record on the VLC Shipping Assisted Setup list page.
- Fill the data in Shipping User Setup and Click on Close.
- Here you should define Values for the Default Location field and Smart Shipping Allowed field, to complete the Shipping user Setup.
Note: – To set up a warehouse Employee as a shipping user then enter the User ID same as the warehouse Employee User ID.

6. Shipping Agent
- Open the Shipping Agent page by clicking on Shipping Agent Record on the VLC Shipping Assisted Setup list page.
- Fill the data in Shipping Agent Page as shown in the below screenshot.
Note: FedEx, UPS, and all other required Shipping Agent Information will be filled in at the time of installation of this App.

7. Shipping Agent Services
- Open the Shipping Agent Services page by Clicking on Shipping Agent Services Record on the VLC Shipping Assisted Setup list page.
- Fill the data in Shipping Agent Services Page as shown in the below screenshot
Note: FedEx, UPS, and all other required Shipping Agent Services Information will be filled at the time of installation of this App.

8. Country/Region
- Open the Country/Region page by clicking on the Country/Region Record in the VLC Shipping Assisted Setup list page.
- Click on UPS International and FedEx International field if you would like to assign international shipping and then click on the OK button as shown in the below screenshot

9. FedEx Shipping Account
- Open the FedEx Shipping Account page by clicking on FedEx Shipping Account Record on the VLC Shipping Assisted Setup list page.
- Fill in the FedEx Account Details and Click on close as shown in the below screenshot.

10. UPS Shipping Account
- Open the UPS Shipping Account page by clicking on UPS Shipping Account Record on the VLC Shipping Assisted Setup list page.
- Fill in the UPS Account Details and Click on the Close button as shown in the below screenshot.

11. USPS Shipping Account
- Open the USPS Shipping Account page by clicking on USPS Shipping Account Record on the VLC Shipping Assisted Setup list page.
- Fill in the USPS Account Details and Click on the Close button as shown in the below screenshot.

12. Printer Service Mapping
- Open the Printer service Mapping page by clicking on Printer Service Mapping Record on the VLC Shipping Assisted Setup list page.
- Fill in the Printer details and then click on the Close button as shown in the below screenshot

13. Package Types
- Open the Freight Package types page by clicking on Package Types Record on the VLC Shipping Assisted Setup list page.
- If you want to add any new Package Type then click on New action and Enter Code & Description for New Package and then click on Close button as shown in the below screenshot.

14. Freight Classes
- Open the Freight Classes page by clicking on Freight Classes Record on the VLC Shipping Assisted Setup list page.
- If you want to add a new Freight Class then click on New action & fill in the Freight Class details and then click on the Close button as shown in the below screenshot.

After the assisted setup, we have to assign the below user permissions sets for the shipping user: –
| S. No. | Permission | Comments |
| 1 | D365 BASIC | Specifies the basic permissions |
| 2 | D365 EXTENSION MGT | Specifies the extension management permissions |
| 3 | D365 INV, SETUP | Specifies the inventory setup permissions |
| 4 | D365 SALES DOC, EDIT | Specifies the document edit permissions |
| 5 | D365 SALES DOC, POST | Specifies the document posting permissions |
| 6 | D365 WHSE, EDIT | Specifies the warehouse edit permissions |
| 7 | TEST TOOL | Specifies the testing tool permissions |
| 8 | VLC APP MGMT USER | Specifies the VLC App management permissions |
| 9 | VLC SHIPPING USER | Specifies the basic VLC Smart Shipping User permissions |
| 10 | VLC SMART SHIPPING | Specifies the advanced VLC Smart Shipping permissions |
VLC Smart shipping includes sales order modifications to warehouse and journal posting. Hence, we must assign the above user permissions.